Before I started self hosting all of my stuff, I was using a VPS to host my web services. This was relatively easy to manage, while still giving me the freedom of hosting whatever webservices I want. After setting up my first small homelab, I wanted to host this myself as well, from home. I found it a little bit scary to migrate, but simply copying over the entire docker data directory to my new Ubuntu server VM seemed to work just fine. The problem came with reaching the server from the outside though. My setup is as follows: I have Traefik set up as a reverse proxy, and hosted portainer for managing all my (docker-based) services, which works together well with Traefik. I am using Cloudflare to manage my DNS already, first pointing everything to the public IP of my VPS (without proxying, as that messes up Traefik since it tampers with the Host header).
With self-hosting my services, I decided to first go for the “easy” option: port forwarding. I was a bit naive, and got my public IP and routed all traffic there. Unfortunately, after a while, nothing was reachable anymore. I don’t have a static IP with my ISP, and so my IP address got rotated at some point. I moved to using using DDNS. Since I have my own router (ASUS AX-57) behind my ISPs router, I couldn’t really use the DDNS service that ASUS provides for free with its hardware, as my own router’s WAN IP was a private IP, assigned in the ISP router. Fortunately, my ISPs router has built-in support for various DDNS providers, so I just created a noip account and set it up through there, forwarding ports 80 and 443 to my own router, which in turn forwarded those ports to my server VM.
This is not very satisfying though, because though it is simple it has some flaws:
- You have to forward ports, which may come with security risks.
- I have to configure stuff in my ISPs router, so if I switch ISP or if it gets replaced I have to do it over again
- I have to configure stuff in my own router, which I don’t mind too much (I am using its DHCP server as well), but the less configuration in my router, the better.
So since I am already with Cloudflare, I decided I want to set up a Cloudflare tunnel. Here is the process I went through:
Setting up a Cloudflare tunnel to a Traefik reverse-proxy
There is a nice tutorial written by GitHub user sfnemis (mirror on my own GitHub). I partly used this, I partly used ChatGPT and I partly Googled around to fix issues.
- Create a (free) account for Cloudflare Zero Trust.
- Run the Proxmox Helper Script for a Cloudflared LXC. If you are not using Proxmox, you should be able to just install cloudflared.
- Also configure the local (static) IP, and everything else you might want to configure for your Proxmox LXCs.
- In your LXC (or your system with cloudflared installed), run
cloudflared tunnel login- This will output a URL, open it, log in and select your domain
- It will create a file
/root/.cloudflared/cert.pem.- Note: I first ran cloudflared through Docker on my server VM (which ChatGPT suggested, but it was an annoying suggestion). It should “integrate better with my existing docker network”. In the end, it seems to have placed this certificate in some Docker volume, making me lose my mind when I couldn’t find it.
- Create a tunnel (e.g.
vps-tunnel) withcloudflared tunnel create vps-tunnel- This will output some info, like the location of your credentials file (at
/root/.cloudflared/vps-tunnel.json) and the tunnel UUID. Store the UUID in an environment variable withTUNNEL_ID=xxxxxxxx-xxxx-xxxx-xxxx-xxxxxxxxxxxx.
- This will output some info, like the location of your credentials file (at
- Create a systemd service file for cloudflared:
# Create service file
cat > /etc/systemd/system/cloudflared.service << EOF
[Unit]
Description=Cloudflare Tunnel
After=network-online.target
Wants=network-online.target
[Service]
Type=simple
User=root
ExecStart=/usr/bin/cloudflared tunnel run
Restart=on-failure
RestartSec=5s
[Install]
WantedBy=multi-user.target
EOF
# Enable and start service
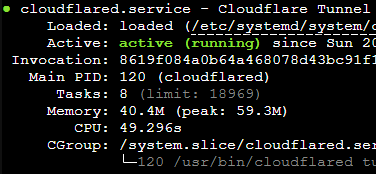
systemctl daemon-reload
systemctl enable cloudflared
systemctl start cloudflared- Create DNS entries for the tunnel (replace example.com with your domain):
- Create a wildcard subdomain DNS record for the tunnel with
cloudflared tunnel route dns $TUNNEL_ID "*.example.com"- Note: this will serve as a “catchall” for any subdomains that are not configured to have a specific DNS record. If you are migrating your setup (like I was), you can then easily migrate every service separately by removing their existing DNS records one-by-one, but in the end they should all be gone from your Cloudflare DNS dashboard.
- You can also create a route for your root domain with
cloudflared tunnel route dns $TUNNEL_ID example.com
- Create a wildcard subdomain DNS record for the tunnel with
- Restart the cloudflared service with
systemctl restart cloudflared.- If it can’t find the credentials file, it will tell you where it expects it to be. You can fix the location with:
cp /root/.cloudflared/TUNNEL_ID.json /etc/cloudflared/credentials.json
- If it can’t find the credentials file, it will tell you where it expects it to be. You can fix the location with:
- At this point, I tried creating the configuration file, configuring the tunnel from my VPS and routing traffic through there, but I kept getting 404s from Traefik. At this point, I just migrated the tunnel management to the Cloudflare Zero Trust platform.
- In the Cloudflare Zero Trust platform, go to Networks > Tunnels and click your tunnel. It will tell you that it is not managed from the Cloudflare Zero Trust platform, and have a wizard to migrate it.
- It seems that the 404’s came from the fact that Traefik is set to only allow HTTPS, but the records I had configured in the cloudflared config.yml were set to be HTTP-type services.
- Note: migrating your tunnel management to the Cloudflare Zero Trust platform is irreversible. If you want to keep everything local, you can, but you’d have to translate these instructions to the
/etc/cloudflared/config.yml-based setup.
- In Cloudflare Zero Trust, go to Networks > Tunnels and click your tunnel’s name, (vps-tunnel) and click “Edit”. Go to the “Published application routes”. You can now add routes for your applications (tied to subdomains of your own domain). To add a service, do the following:
- Click add a published application route.
- Enter the subdomain your service is at (this should be what Traefik expects it to be, though you can even configure it to be something else, and set the Host header to whatever Traefik expects it to be for the service you want.
- Select your domain (and optionally a path)
- Set the service type to HTTPS. This is very important if your Traefik reverse proxy is set to disallow insecure requests.
- In the URL, set the IP (or hostname) from which your cloudflared LXC or machine can access Traefik. For me, this was
192.168.50.30, as that is the IP of my server VM on my LAN, but for you it may just belocalhost(ifcloudflaredis running on the same machine as Traefik) or some other IP or hostname. - Under “Additional application settings” configure the following:
- HTTP Settings > HTTP Host Header: Set it to the URL Traefik expects for the service you are configuring. This is very important, as otherwise Traefik can’t route the request properly.
- TLS > No TLS Verify: Turn this on, as otherwise cloudflared may not accept the self-signed certificates you may currently be using.
Note: Cloudflare tunnels do not support multi-part subdomains (i.e. something.other.example.com), unless you pay for a premium subscription. I found this quite a shame, but I could just replace the dots with dashes (something-other.example.com). It’s less pretty, but oh well. At least I could just keep the HTTP Host Header setting to the multi-part subdomain I had configured in Traefik already, so lazy me didn’t have to go around changing docker compose files.